


ClickDimensions campaign automations are great for automating many types of tasks such as sending emails. Once an email has been sent, your recipients can be nurtured as needed and you can continue planning your future nurture strategy. But what you might be wondering is how many of your recipients couldn’t be reached due to a hard or soft bounce or other exclusion. You can create your own queries for this type of data, but this blog post will show you how you can store that data directly on the campaign automation record.
This method will require creating some custom fields (rollup and calculated) as well as a short workflow, so you may need to work with your CRM admin to ensure these items are set up as they prefer.
Bounces
First, we will add our bounce fields onto the campaign automation entity, beginning with the rollup fields—total sent emails, soft bounces and hard bounces. Our focus is on the field properties, so if you need guidance on creating a new field, you can find that here.
Rollup Fields
Our rollup fields’ properties should have the Data Type set to Whole Number and Field Type to Rollup as shown below.

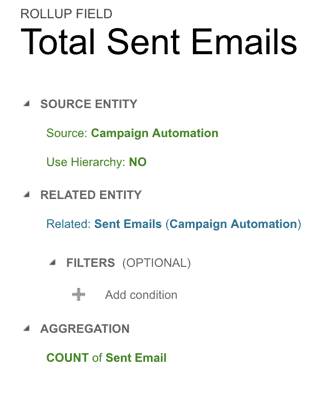
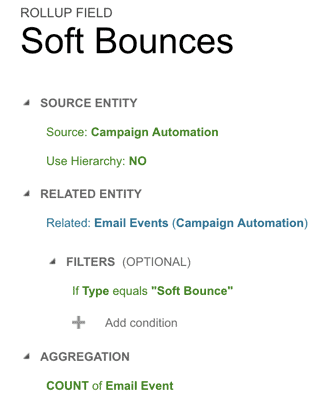
And now for our rollup fields:
1. Total Sent Emails: Counts all sent emails associated with a campaign automation.
2. Soft Bounces: Counts all soft bounce email events associated with a campaign automation.
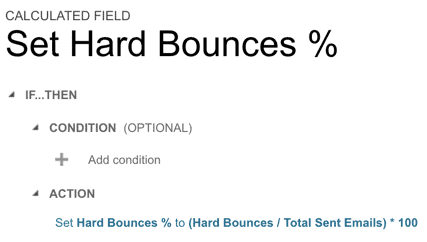
3. Hard Bounces: Counts all hard bounce email events associated with a campaign automation.
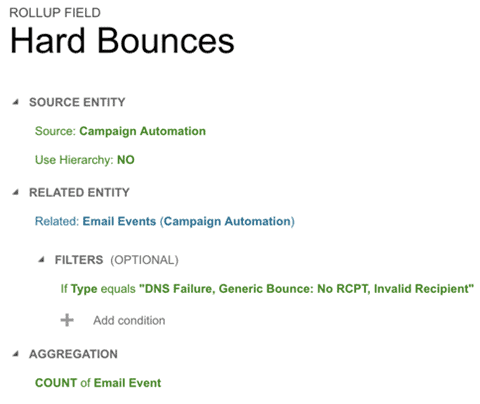
Note: The Spam Content type was not included here because it is technically not a hard bounce. It’s considered a spam complaint, so it is treated as a hard bounce would be with the recipient not being sent to unless unblocked. But you can include it here or in your own report if you need to see it accounted for.
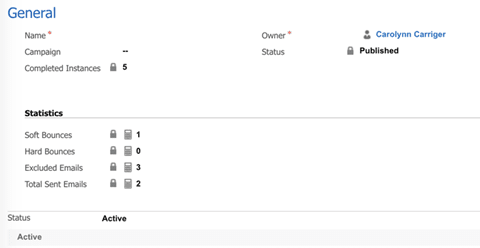
And now you can see those rollup fields on the left side of the Statistics section. That section is a customization I added to the campaign automation entity.
If all you want to see is a simple count of each bounce type, you could certainly stop here. However, it’s usually best to see this data in relation to all the emails that were sent, so you can go a step further and create the calculated fields (shown below).
Calculated Fields
Our calculated fields will be set up with a Data Type of Decimal Number and Field Type of Calculated. The Precision option lets you specify how many digits past the decimal point the resulting field should use—my field is using two, as shown below.

Your formula for each field (demonstrated below) is ([bounce field]/Total Sent Emails)*100. So, we’re using the Total Sent Emails field as our denominator and multiplying the result by 100. That way when anyone reads these fields, they know the actual percent value and don’t have to do any mental calculations.
Soft Bounces

Hard Bounces
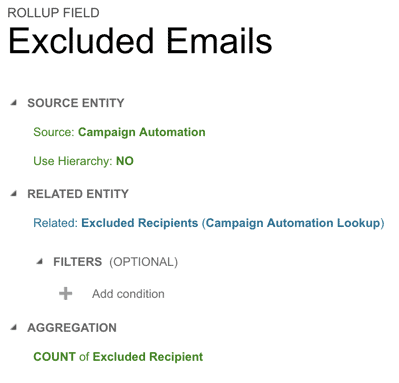
Excluded Recipients
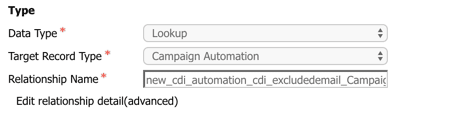
For the Excluded Recipient rollup and calculated fields, we need to create a relationship between the excluded recipient and campaign automation entities.
Note: Prior to ClickDimensions version 9.2, the excluded recipient entity was called excluded emails.
Relationship via a Lookup Field
The first step is to add a lookup field to the excluded recipient entity. Because there is no direct relationship between excluded recipient and campaign automations, we will use the email send (related to both) to connect the two.
Add the field to the excluded recipient with the setup shown below.
The Workflow
This workflow will update the lookup field each time an excluded recipient is created from an email send associated with a campaign automation.
Go to Settings > Processes and create a new workflow set at the Excluded Recipient entity.
Then set the workflow’s properties to match the below.
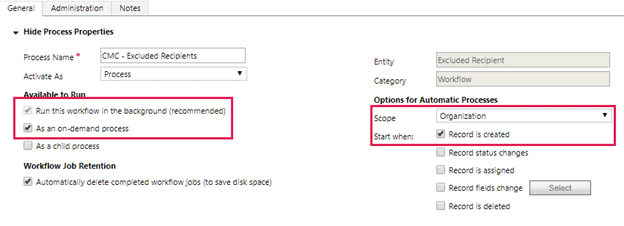
Available to Run
Set it to run in the background and on-demand. Why? With both options selected, this workflow can run whenever an excluded recipient record is created, but you can also run it as needed on existing excluded recipient records.
Options for Automatic Processes
Set the Scope to Organization and the Start to when a Record is Created.
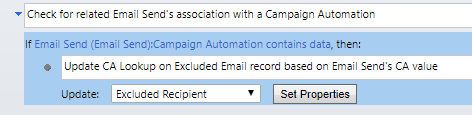
In the workflow stage area, add a check condition.

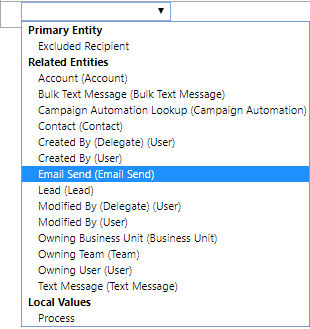
Set your criteria to look for whether the parent email send has a value in the campaign automation field.
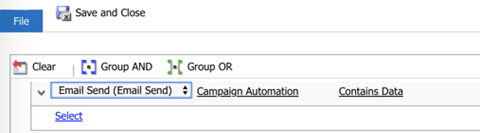
Make sure you select the email send option from the Related section of the dropdown; otherwise your query will be looking for the wrong data.
Next, you will select a following step of Update Record. It will update the Excluded Recipient record.
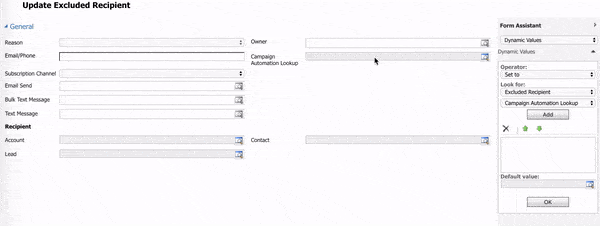
On the Set Properties screen, you will see the lookup field we created earlier. This field is what we’re updating, so we will go to the Dynamic Values pane at the right of the window and select Email Send > Campaign Automation > Add. A dynamic value will be generated, so click in the campaign automation lookup field we created earlier and select the Ok button from the right pane. That value will be added to the field as shown below.
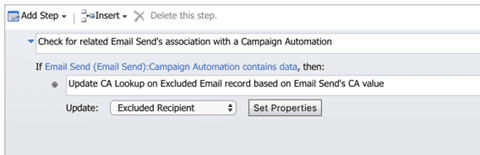
Save and close this window. Your workflow should look like this:
Now, Save and Activate the workflow so you can start using it.
Corresponding Fields
Back on the campaign automation entity, you can now add your excluded recipient rollup and calculated fields.
The rollup field will imitate the soft/hard bounces fields, but will run off the lookup field we just created.
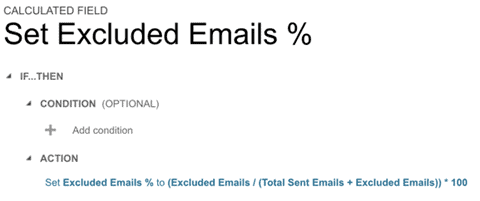
The calculated field will also imitate the soft/hard bounces fields; however, the formula is different. Total Sent Emails counts everyone we attempted to send to, but Excluded Recipients are individuals we couldn’t even attempt to send to. As a result, we need to add the Total Sent Emails and Excluded Recipients together and use that number as our denominator. So our formula is (Excluded Recipients/(Total Sent Email + Excluded Emails}}*100. Again, multiplying by 100 converts the decimal number to a percentage value.
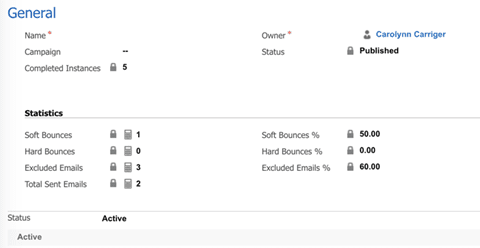
Now you’ll be able to see these three statistics relative to emails that Campaign Automation sent.
This should help you as you continue to use campaign automations and emails in your customer messaging.
Happy Marketing!
Related Resources

How Sales and Marketing Alignment is your Key to SMB Success
Many small to medium businesses (SMBs) often grapple with one common challenge: disjointed sales and marketing communications. This misalignment can lead to missed opportunities, frustrated customers, and ultimately hindered [...]

How to Improve your Account and Buyer Insights
Understanding your target accounts and buyers is critical in today's competitive business landscape. However, many small to medium sized businesses (SMBs)face one common hurdle: the absence of comprehensive account [...]

Navigating the Sales Pipeline: Top 5 Challenges and Solutions
A well-managed sales pipeline is the lifeblood of any successful sales operation. However, it's not without its challenges. Small to medium sized businesses (SMBs) with well-defined sales processes and [...]
")
